
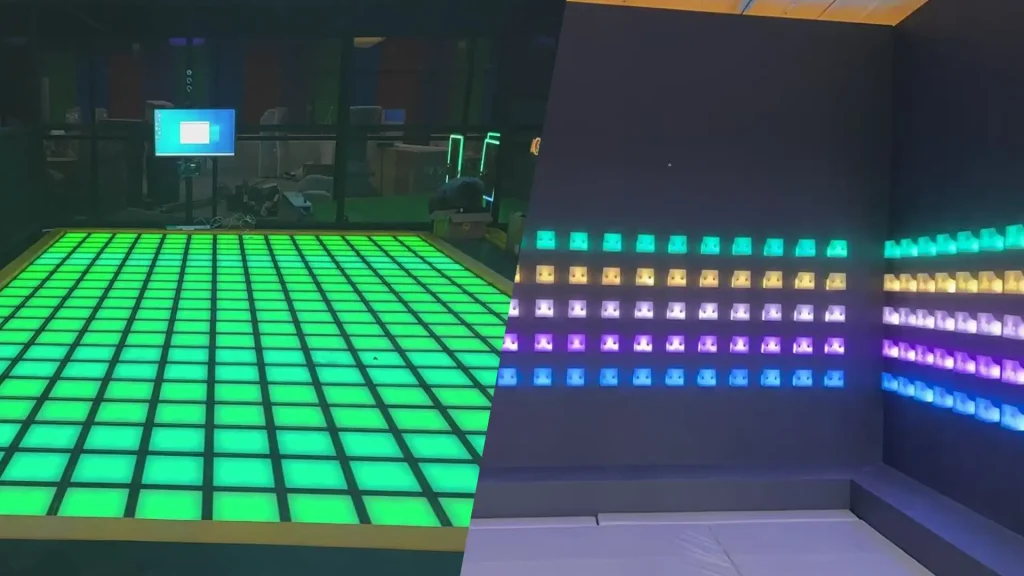
Interactive Gaming Room Layout: How to Plan Space and Player Flow for an FEC
A commercial interactive gaming room layout should be planned around more than total floor area.
The same 200 m² venue can produce very different results depending on its shape, entrance position, attraction mix, player capacity, waiting requirements and operating model. One venue may feel like a clear entertainment circuit. Another may feel like a collection of disconnected machines placed inside the same room.
That is why an effective interactive gaming room layout begins with four questions:
- How much space is actually available for gameplay?
- How should attractions be combined?
- How will players move between rooms?
- What support areas are required for daily operation?
The space ranges in this guide are practical planning references for FECs, active gaming venues, arcades and other commercial entertainment projects. They are not fixed construction standards. Final dimensions should always be confirmed against the selected equipment, venue conditions and local building requirements.
For a broader look at attraction selection, ROI, and supplier evaluation before you get to layout specifics, see our How to Build an Interactive Gaming Room guide.
Why Square Footage Alone Is Not Enough
A supplier can understand the size of a box from a number such as 200 m² or 500 m². That number does not explain how the venue needs to work.
A commercial game room layout also needs to account for:
- The number of players moving through the venue at the same time
- Typical group sizes and session format
- Walk-in traffic, timed sessions or booked parties
- Entrance and exit locations
- Reception, ticketing and briefing requirements
- Waiting and spectator areas
- Emergency exits and fixed building structures
- The position of the visual anchor attraction
- Equipment access, maintenance and service space
If these factors are ignored, the problems usually appear after the project has already progressed. Reception may be pushed into an unsuitable corner, player circulation may become congested, and the most important attraction may be hidden from passing visitors.
A useful FEC floor plan therefore starts with the customer journey, not with a list of machines.
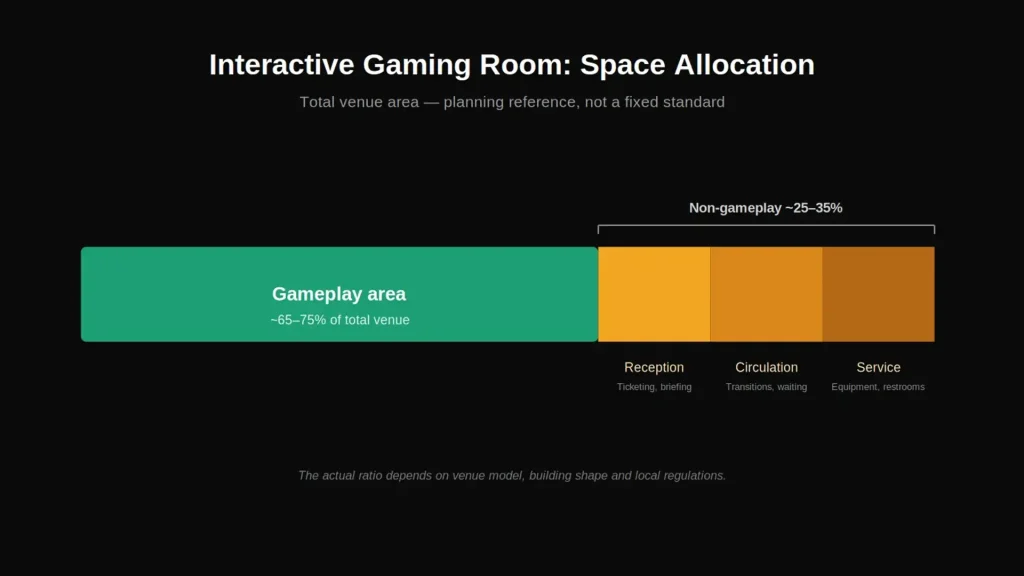
How to Allocate Space in an Interactive Gaming Room
Non-Gameplay Space
As an initial planning allowance, many commercial projects reserve approximately 25–35% of the total venue for non-gameplay functions.
This may include:
- Reception and ticketing
- Player briefing
- Circulation and transitions
- Lockers or storage
- Waiting and spectator areas
- Equipment or service rooms
- Restrooms
- Staff access and maintenance space
This percentage is a planning reference, not a universal rule. A booking-based venue with controlled arrivals may require a different balance from a shopping mall attraction with heavy walk-in traffic.
The final ratio depends on the venue model, building shape, local regulations and the type of attractions selected.
Gameplay Area and Player Capacity
The remaining area must be divided between playable zones, equipment clearance and the movement required around each attraction.
For many multiplayer active gaming concepts, groups of approximately 2–5 players per attraction can be used as an early planning reference. Actual capacity depends on:
- Game mechanics
- Playable area
- Equipment configuration
- Session length
- Staff operating procedures
- Whether players compete individually or as teams
Player capacity should therefore be planned together with room size. A larger room does not automatically produce better throughput if the entrance, briefing area and transition path cannot handle the same number of people.
Venue Shape
The geometry of the building strongly affects the best interactive game room design.
A long, narrow venue may work better with a linear player route:
Entrance → Briefing → Main Attraction → Challenge Rooms → Team Game → Exit
A square or wider venue may support a central loop, with attractions positioned around a shared circulation area.
Columns, low ceilings, structural walls and emergency exits should be mapped before selecting the equipment combination.
A Simple Formula for Estimating Usable Space
Before comparing attraction combinations, it helps to work through the space allocation in order:
Total venue area → minus non-gameplay space (≈25–35%) → minus circulation and equipment clearance → remaining gameplay area → divided by the footprint of each planned attraction → indicative attraction count and player capacity
This is a planning sequence, not a fixed calculation — circulation needs vary with venue shape, and attraction footprints vary with the selected equipment. But working through the steps in this order, rather than starting from “how many games can I fit,” is what usually prevents the layout problems described earlier in this guide.
Choose the Game Mix Around Four Player Activity Types
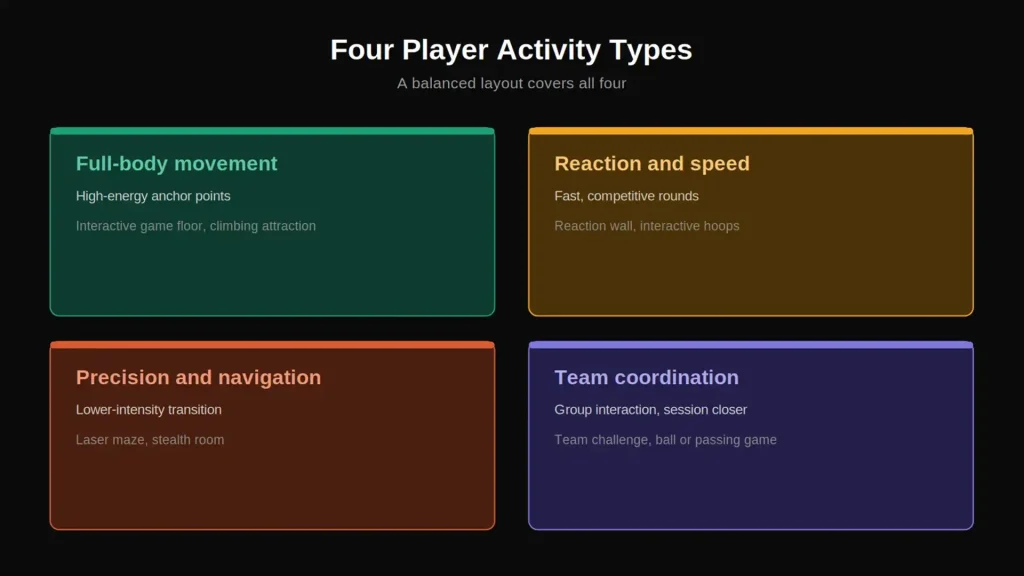
A strong active gaming venue does not need every possible attraction. It should provide different types of physical and social interaction.
| Activity Type | Example Attractions | Layout Purpose |
|---|---|---|
| Full-body movement | Interactive game floor, climbing attraction | High-energy anchor points |
| Reaction and speed | Reaction wall, hoops game | Fast competitive rounds |
| Precision and navigation | Laser maze, stealth room | Lower-intensity transition |
| Team coordination | Team challenge, ball or passing game | Group interaction and session closer |
This structure helps prevent the venue from becoming too repetitive. It also gives different members of the same group a chance to perform well in different types of games.
For example, a group may begin with a visually strong interactive floor, move into a fast reaction game, recover in a precision-based challenge and finish with a cooperative team attraction.
Indicative Space Ranges for Common Attractions
The following figures are practical planning references used during early commercial discussions. They should not replace the selected product’s technical drawing.
| Game Type | Indicative Planning Range | Player Activity |
|---|---|---|
| Interactive game floor | Approximately 25–40 m² for a standard multiplayer zone | Full-body movement |
| Compact interactive floor | Approximately 10–25 m² | Small-group active play |
| Expanded interactive floor | Approximately 40–70 m² or more | Larger groups and flagship zones |
| Reaction wall | Approximately 15–25 m² | Reaction and speed |
| Laser maze | Approximately 15–25 m² | Navigation and precision |
| Interactive hoops | Approximately 15–25 m² | Sports and reaction |
| Target or throwing game | Approximately 15–25 m² | Accuracy and coordination |
| Team challenge attraction | Approximately 15–25 m² | Cooperation and competition |
| Climbing attraction | Approximately 20–30 m² or more | Vertical movement |
The correct footprint depends on the selected configuration, player capacity, equipment clearance, wall height, service access and building conditions.
For a final layout, request the equipment drawing rather than relying only on a general room-size estimate.
Mapping Attractions to Product and Project Requirements
An interactive gaming room layout may combine several game types, but each attraction serves a different purpose in the player journey.
- An interactive game floor can act as the main visual anchor.
- A reaction wall can support short, competitive rounds.
- A laser maze game can create a precision-based change of pace.
- An interactive hoops game can introduce a familiar sports challenge.
- A target throwing wall can provide accuracy-based gameplay.
- A team challenge game can create a strong group finish.
- A climbing attraction can add vertical movement where ceiling height allows.
- A strategy or stealth room can create a lower-intensity transition.
The final game mix should be based on venue goals, audience, budget, available space and operating model.
Why an Interactive Game Floor Often Works as the Layout Anchor
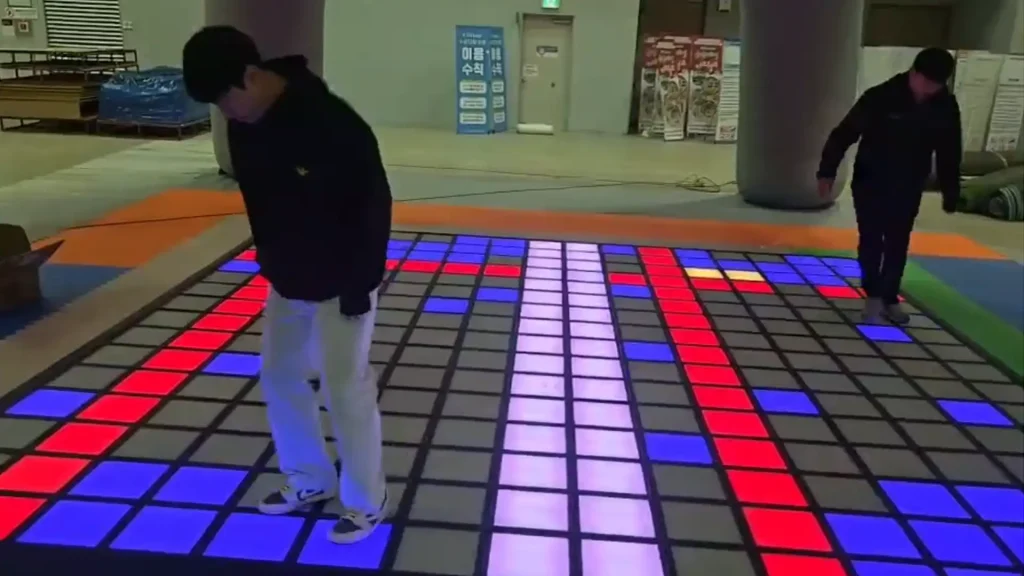
Across the venue-size examples in this guide, the interactive game floor is consistently positioned as the anchor attraction rather than just one item in the equipment list. This is a layout decision, not only a product recommendation.
An anchor attraction needs three things: visibility from the entrance or passing traffic, a footprint large enough to host groups rather than individuals, and gameplay that is easy to understand by watching for a few seconds. An interactive game floor generally satisfies all three — it reads clearly from a distance, scales from a compact 20 m² zone up to a 70 m²+ flagship configuration without changing its core mechanic, and its multiplayer format matches the “group coordination” activity type that a layout typically needs at its entry point.
That is the layout reasoning behind treating it as the anchor: it is usually the attraction the rest of the room is planned around, not the attraction added last.
Why Layout Dimensions Are Never Fixed
The space ranges above are planning references, not fixed specifications — and there is a practical reason why.
A single interactive game floor room can work in as little as 20 m². But once a venue combines multiple attractions — including equipment that needs to be matched into the same circuit — the required footprint, room shape and circulation path all change. Two venues targeting the same attraction mix rarely end up with identical dimensions, because the actual constraint is not the equipment itself but how it fits together with everything else in the room.
This is also why layout planning is offered as a customized service rather than a fixed package. Room dimensions can be adjusted to match the actual venue — its shape, entrance position, existing structure and the mix of attractions being installed — instead of forcing the venue into a predetermined size.
Real Project Example: Approximately 231 m² Jordan Gaming Room
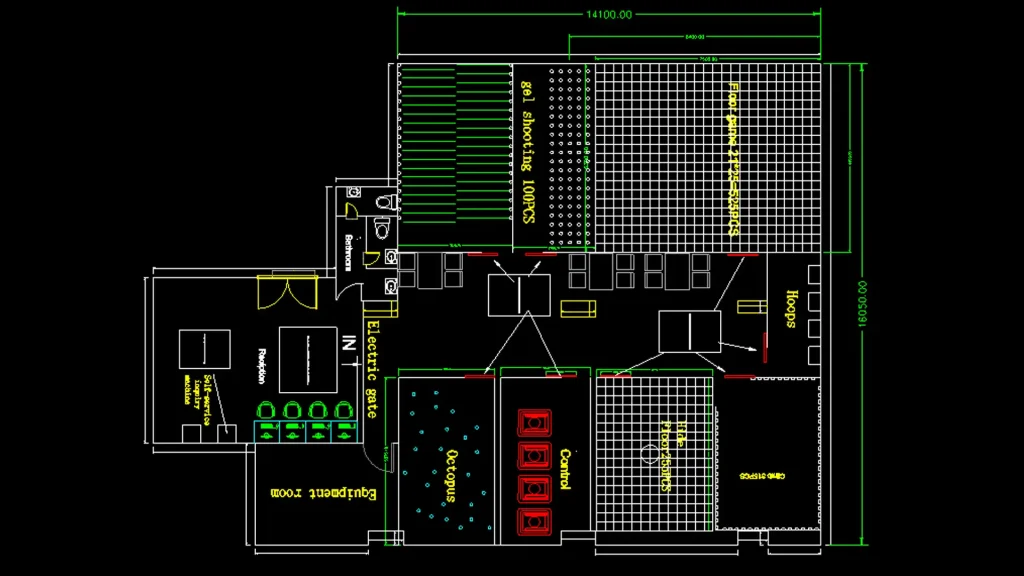
A real Jordan customer project provides a useful example of how a commercial gaming venue can combine gameplay and support areas.
The drawing shows an overall envelope of approximately:
16,050 mm × 14,400 mm — approximately 231 m²
The layout includes several labeled game areas, including:
- Floor game — 21 × 25 = 525 pieces
- Hoops
- Climb — 315 pieces
- Hide Floor — 255 pieces (a second, separate floor-based game from the main Floor game)
- Gel shooting — 100 pieces
- Control — four individual game stations
- Octopus
- Reception
- Equipment room
- Bathroom
- Electric gate
- Self-service ticketing area
- Central circulation and transition space
- 3D background wall
The main planning lesson is that the 231 m² envelope is not equivalent to 231 m² of playable equipment space.
Breaking the envelope down by function:
- Gameplay zones: Floor game (525 pieces), Hoops, Climb (315 pieces), Hide Floor (255 pieces, a second and separate floor-based game), Gel shooting (100 pieces), Control (four game stations) and Octopus together occupy the core of the layout
- Reception and entry control: the reception desk and electric gate sit at the arrival point, ahead of the self-service ticketing area
- Circulation: the central transition space appears to separate the main game zones and support movement through the venue
- Service: the equipment room and bathroom sit outside the main gameplay zones
The layout must also support:
- A clear arrival point
- Player entry control
- Movement between attractions
- Staff and equipment access
- Service and restroom requirements
- A visible and understandable customer journey
This is why an interactive gaming room layout should be evaluated by usable gameplay area and player flow, rather than by total square footage alone.
For how the same logic scales up, the 300–350 m² and 450–500 m² examples later in this guide show what typically changes as more attractions and circulation space are added.
The project drawing is a real planning reference. It is not intended to represent a universal layout standard or a final construction drawing for every venue.
Interactive Gaming Room Layout Examples by Venue Size
Approximately 200–250 m²
A venue in this range can support a compact multi-attraction circuit.
A practical planning concept may include:
- One interactive floor or other visual anchor
- Two to four smaller attractions
- A reception and briefing point
- A defined transition route
- A small waiting or viewing area
- Required service and staff space
At this size, the main challenge is avoiding overcrowding. Fewer attractions with better circulation may produce a stronger customer experience than trying to fill every available area.
The Jordan project described above, at approximately 231 m², demonstrates how multiple attractions can be combined with reception, service and circulation requirements.
Approximately 300–350 m²
This size provides more flexibility for a multi-room active gaming venue.
A possible combination may include:
- One larger interactive game floor
- A reaction attraction
- A laser or precision-based room
- A sports attraction such as interactive hoops
- A strategy or stealth room
- A team challenge attraction
- A larger waiting or social area
The additional space can be used to improve the route between rooms rather than simply adding more equipment.
Approximately 450–500 m²
A larger venue can support a broader attraction mix and more flexible circulation.
Depending on the building, operators may choose to:
- Expand the main interactive floor
- Add a second compact floor zone
- Create separate routes for different groups
- Add more reaction or sports attractions
- Include a climbing attraction
- Increase waiting and social space
- Provide more dedicated service and staff areas
At this scale, the layout should be designed around peak-period movement. Two groups should be able to move through the venue without blocking each other at entrances, briefing areas or narrow transitions.
How to Plan Player Flow Through the Venue
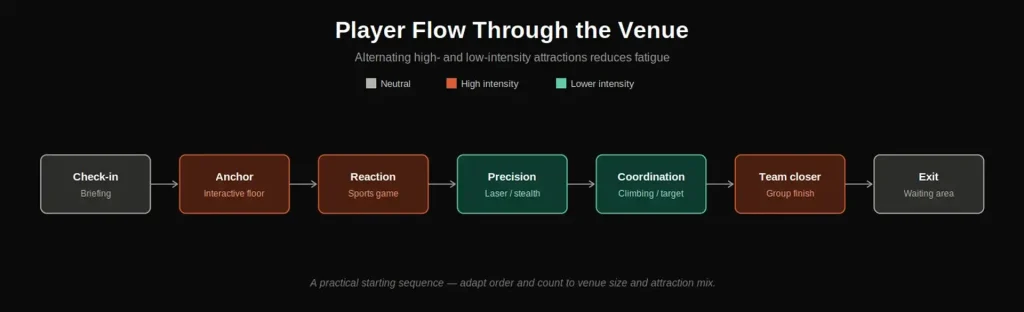
The sequence of attractions affects how players experience the entire session.
A practical starting sequence is:
Check-in and briefing → High-energy anchor attraction → Reaction or sports game → Precision or stealth challenge → Climbing, target or coordination attraction → Team challenge closer → Waiting area or exit
This sequence alternates higher- and lower-intensity activities. It can help reduce early fatigue and give the session a clearer rhythm.
Make the Entrance Easy to Understand. Players should be able to identify where to check in, where to wait and where the session begins.
Keep Service Areas Out of the Main Route. Equipment rooms, staff access and maintenance areas should be reachable without creating unnecessary contact with active players.
Avoid Cross-Traffic. Two groups should not repeatedly cross each other in a narrow corridor or wait directly in front of another attraction.
Use the Anchor Attraction for Visibility. The most visually impressive attraction can often be positioned where passing visitors or waiting guests can see it.
Design the Exit as Part of the Experience. The final attraction and exit path should provide a clear ending rather than forcing players to walk back through the busiest part of the venue.
Technical Information to Prepare Before Ordering
A supplier can prepare a more accurate CAD layout when the following information is available:
- Total venue length and width
- Ceiling height
- Entrance and exit positions
- Emergency exits
- Columns and fixed structural walls
- Existing floor levels
- Available power and network points
- HVAC and ventilation conditions
- Fire protection requirements
- Target player capacity
- Session length and operating model
- Preferred attraction types
- Required reception, waiting and service areas
A scaled floor plan is helpful, but it is not always required to begin a preliminary discussion.
The final design should be checked by the appropriate local professionals for fire safety, accessibility, electrical work, structural conditions and building-code compliance.
Common Interactive Gaming Room Layout Mistakes
Treating Total Area as Playable Area. Reception, circulation, restrooms, equipment access and waiting space all affect the usable game area.
Planning Around Only One Game Type. A venue with only high-intensity attractions may feel repetitive and tiring. A combination of movement, reaction, precision and teamwork usually creates a more balanced experience.
Ignoring Building Geometry. A room-size estimate cannot account for columns, structural walls, unusual proportions or restricted access.
Creating Narrow Transitions. Attractions may fit on paper while the route between them becomes uncomfortable during a busy session.
Using Unverified Equipment Dimensions. General planning ranges are useful early in the process. Final ordering decisions should use the selected product’s technical drawing.
Showing a Concept Image as a Real Installation. AI-generated visuals can communicate a design direction, but they should be identified as illustrative concepts. They should not be presented as photographs of a real customer project.
What Information Does a Supplier Need to Create a Layout?
To develop a preliminary interactive gaming room layout, send:
- Total floor area
- Length and width
- Ceiling height
- Basic floor plan or CAD file
- Entrance and exit locations
- Emergency exits
- Fixed columns or walls
- Target audience
- Expected player capacity
- Preferred attraction types
- Venue type
- Planned opening schedule
- Any available power, network or HVAC information
From this information, a supplier can help estimate the usable game area, recommend an attraction combination and prepare a preliminary CAD layout.
What You Get From a Preliminary Layout Consultation
Sending venue information does not commit you to an order. A preliminary layout consultation is meant to turn a square footage number into a workable plan before any equipment decision is made.
Based on the details above, a preliminary consultation typically produces:
- A gameplay area calculation, separating usable game space from reception, circulation and service space
- A recommended attraction combination based on venue size, audience and business model
- A preliminary player-flow proposal showing entry, sequence and exit
- Suggested placement for the anchor attraction and supporting attractions
- A draft CAD layout for review and revision
- A power, network and space reference for your contractor or architect
- A preliminary factory quotation based on the proposed configuration
This type of preliminary layout consultation can be adapted to a venue’s dimensions, attraction mix and operating goals.
Ready to Plan Your Interactive Gaming Room Layout?
If all you have right now is a square footage number, that is a useful starting point, but it is not a complete project brief.
Send your floor plan for a preliminary layout consultation — even a basic sketch with total dimensions is enough to start. The layout team can then help evaluate:
- Usable gameplay space
- Non-gameplay space requirements
- Suitable attraction combinations
- Player flow
- Equipment access
- Preliminary CAD planning
- Factory quotation requirements
For operators researching the business model itself, see:
- What Is Activate Games?
- Activate Games vs Interactive Gaming Room
- How to Build an Interactive Gaming Room
View our Interactive Game Floor product page Contact us on WhatsApp to start your layout consultation
FAQ
Is there a standard size for an interactive gaming room?
No single standard applies to every commercial venue. As an early planning reference, compact interactive floor zones may occupy approximately 10–25 m², standard multiplayer zones approximately 25–40 m² and expanded zones approximately 40–70 m² or more. Final size depends on the selected equipment, player capacity and building conditions.
How much space should be reserved for reception and circulation?
A preliminary planning allowance is approximately 25–35% of the total venue for reception, circulation, lockers, briefing, waiting, restrooms and service functions. The correct percentage depends on the venue model and local requirements.
Can a 200 m² venue support multiple interactive attractions?
Yes, but the attraction mix must be selected carefully. A compact venue may work better with one anchor attraction, several smaller challenges and a clear circulation route than with too many attractions placed too closely together.
What is the best game combination for an FEC?
There is no universal combination. A balanced starting point often includes full-body movement, reaction and speed, precision or navigation, and team coordination. The final mix should match the audience, business model and available space.
Can I get a layout plan if I only know my total square footage?
Yes. Total area is enough to begin a preliminary discussion. A more accurate layout requires the venue dimensions, ceiling height, entrance and exit positions, fixed structures, target capacity and preferred attraction types.
Is a concept layout the same as a final construction drawing?
No. A concept layout or illustrative visual communicates a design direction. A final construction plan must be based on measured venue conditions, the selected equipment’s technical drawing, safety requirements and local engineering review